How to Create & Set Up QR Check-in to Enhance Event Experiences
Think back to all the events you’ve attended in person this year. What was the check-in process like? Was it with a traditional pen-to-paper approach? Did you have to stand around in line? Or was it as quick and easy as scanning your badge on your way in?
Many event organizers opt for contactless check-in methods since it’s a hassle-free, fast, and safe way to manage check-in without long lines at the registration desk. More importantly, guests and attendees appreciate the simplicity and speed of contactless check-in experiences.
Event planners can take a lesson out of the hospitality playbook. According to HotelTechReport, offering keyless entry increases guest satisfaction by an average of 7%. More notably, guest satisfaction drops 50% when there’s a 5-minute wait at the check-in desk!
As an event organizer, one of the best ways you can show attendees you value their time is by speeding up the check-in process with QR codes.
So, in this article, we’ll explore common questions around QR codes, provide tips on setting up a QR check-in process that runs smoothly, and guide you through the steps of adding QR codes to your event badges.
What Is a QR Check-in Code?
A QR check-in code is a unique “quick-response” code assigned to attendees to use at check-in.
Offering QR check-in allows attendees to check in at an event by simply scanning their QR code. This eliminates the need for paper lists, lengthy spreadsheets, or long wait times at the registration desk.
How Do You Use a QR Code to Check In Guests at Your Event?
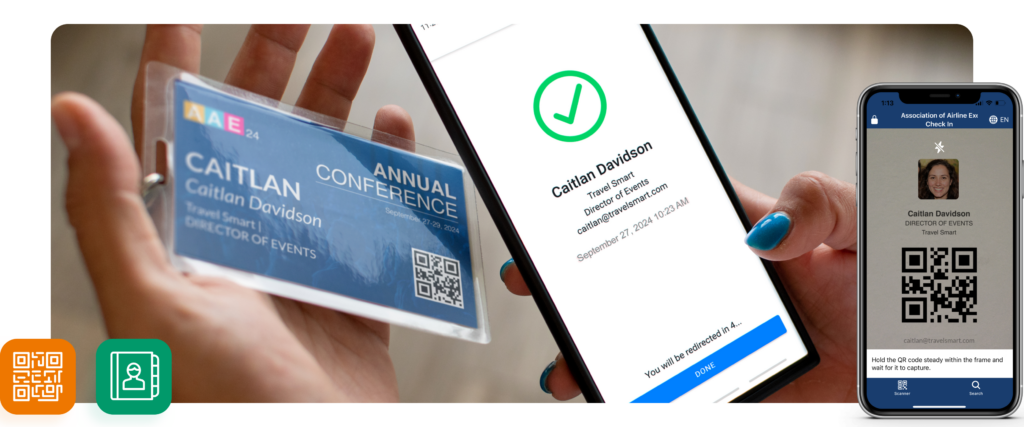
Event attendees might receive a QR code in a confirmation email, in their event app, or even on their event badge. When guests arrive at the venue, event staff can check them in by scanning their QR code. In some cases, guests may be able to check themselves into an event using a self-service check-in kiosk.
Every QR code is unique. Once scanned, it’ll let event organizers access information like:
- Which event it’s for
- The date and time of the event
- The name of the associated attendee
- Sessions the attendee is registered for
- Whether the ticket has been paid for
- And more!
This allows the entire check-in process to be dramatically sped up. Scanning QR codes takes less than a second, which saves organizers time as well as improves the attendees’ event experience immensely!
How to Scan a QR Code from Your Phone
When it comes to QR code check-ins, it doesn’t matter what type of device your attendees use to display their code. Whether it’s a smartphone, a tablet, a laptop, or their event name badge–as long as the device or badge is capable of displaying the QR code, your attendees will be able to use the QR check-in process.
Of course, any event staff who are checking in attendees will need to have a functional camera on their phone or tablet–or compatibility with your QR code scanning app of choice!
How to Create a Check-in QR Code for an Event
Creating a random QR code is easy—you can use any old QR code generator found online. But if you want to create an event check-in QR code, it’s best to use an event ticketing app or event management platform like EventMobi.
With an event management platform, you can:
- Set up an event website to drive registrations
- Record event registrants’ information like name, email, phone number, and more
- Attribute each event attendee’s information to a unique QR code
- Deliver the QR code via an automated confirmation email or the event app–or include it on the attendee’s badge design!
This means you can use the event platform to generate unique QR codes for each attendee and to check them in! Some event management platforms, such as EventMobi, also allow you to design attendees’ badges and export them for easy pre-printing before your event.
10 Tips for Managing Event Check-in with QR Codes
So, now that you’ve decided to check in your guests with QR codes, let’s talk about how to make the process as smooth as possible. Here are 10 tips to help you set up a QR code check-in system for your event:
1. Choose your platform
The event platform you choose should be a reliable event ticketing or event management platform to streamline your QR check-ins!
If you don’t yet have an event management platform, consider an all-in-one solution like EventMobi to help you organize your event and check in your guests (among other event benefits!).
With EventMobi’s Badge Designer and Event Check-in App, you can:
- Design custom badges for different groups of attendees with just a few clicks
- Turn any iPad and tablet into a streamlined event check-in kiosk
- Look up attendee details by scanning either pre-printed or digital badges from their Mobile Event App profile (which contains QR codes)
- Track event and session check-ins and attendance

To choose the right mobile app to manage your event, look into the features you want in the app, as well as the company’s reputation, customer support, reviews, and more.
Of course, if you don’t need all the features that come with an event management app, you can use an event ticketing or registration platform instead!
EventMobi’s Onsite Package includes the Badge Designer and Event Check-in App, and can be purchased as an add-on to any Single-Event purchase. Get in touch with us today to get a customized quote based on your requirements!
2. Create your QR code
Once you’ve got your event platform, it’s easy to start creating check-in QR codes! Most of the time, you won’t need to manually create QR codes—these will be automatically generated and included in event confirmation emails and attendees’ event profiles.
As long as your event’s all set up in the app and ready to start taking in registrations, the QR codes should be generated and sent to each event registrant.
Eager to see how you can use EventMobi to check in your guests faster? Visit this section to learn how you can create QR codes with the EventMobi platform.
3. Design your badge
A professional event badge can make a great first impression for your event! If you’re planning to use printed badges, make sure you design the badges with a clear and prominent QR code placement. You can add your event logo, attendee name, and any additional event branding to make the badge visually appealing.
With EventMobi’s Badge Designer, you can:
- Choose from standard badge sizes or go fully custom
- Select a badge template or create your unique design with easy-to-use tools
- Pre-print your badges on any desktop printer
We’ll share more tips for designing check-in badges below!
4. Decide where attendees must check in
Your attendees may need to check in at various points during your event, such as the main entrance, individual sessions, workshops, or other specific activities. Make sure you map out your event venue in advance, plan your event schedule accordingly, and let attendees know clearly when and where they can check in!
5. Ensure you can scan the codes
Your check-in staff or volunteers should have the necessary hardware to scan QR codes efficiently! This could include smartphones or tablets with QR code scanning apps, mobile event apps, or dedicated QR code scanners. A printer will also come in handy in case you need to print out badges onsite.
Just make sure the badges’ QR codes are large enough so they can be easily scanned by smartphones!
6. Test, test, test
Before printing or distributing the QR codes for your event, test them to make sure they work. To make sure your event QR code check-in works, set up the test both ways:
- You can register for your event to see how your attendees will receive the code, and get a volunteer to scan your QR code to see if it works
- You can be the event registration volunteer who scans registrants’ QR codes
In either case, make sure you use different smart devices to test. You can also conduct different tests using the venue’s WiFi or your device’s data to see if the codes and your event app work as expected!
7. Print your badges
If you’re providing physical badges with QR codes, one option is to print them in advance of your event. From here, you can either bring the badges to your event to distribute at the registration desk or mail badges out to attendees ahead of time. Make sure you have enough badges for all registered attendees and some extras in case of last-minute registrations.
If you’d rather not print badges ahead of time, there are also badging solutions that allow you to print onsite and ensure event check-in is quick and easy. For example, EventMobi offers a range of onsite badge printing options, including fully-managed Live Badge Printing for a premium guest experience and self-service check-in kiosks.
8. Track your data
Most of the time, your event management platform will help you track QR code scans and collect data on attendee check-ins as well! This data will provide valuable insight into attendance patterns, popular sessions, and attendee engagement.
With EventMobi’s Check-in Analytics, some of the data points you can measure include:
- Total number of people that have been added to the event
- Total number of unique check-ins
- Both check-ins and check-outs over a set period of time
- Breakdown of attendee check-ins and check-outs, including date and timestamps
9. Measure ROI
After the event, analyze the event and session attendance data to assess your event ROI.
As attendees scan in and out of sessions, you’ll see where—and for how long—they spend their time at your event. This is important for awarding CE credits and reporting on sponsored session ROI.
This data will also come in handy when you need to prove the value of your event to potential sponsors next time! Use it to highlight attendee demographics and report on engagement by measuring time spent in sessions.
10. Run a post-event meeting
Besides analyzing the numbers, you should also collect feedback from your team, volunteers, and attendees regarding the check-in process! Send surveys to your attendees and run a post-event analysis with your staff to see how you can improve the check-in experience for future events.
How to Use EventMobi for QR Check In
With EventMobi’s Badge Designer and Event Check-in App, creating a QR code check-in system is a breeze!
Using EventMobi’s Onsite App for event organizers, your team can manually check attendees in or out of the event as well as individual sessions.
Alternatively, you can use the App’s Kiosk Mode to turn any device (including tablets or laptops) into a self-service check-in solution–and set those up near the entrance of your event to prevent lineups.
Here are the steps to check in attendees using QR codes with EventMobi:
Add your attendees
Before you can begin using EventMobi’s Check-in App, you’ll need to define a list of event attendees. There are three ways you can add attendees to your People Library in the Experience Manager:
- Clicking the ‘Add Person’ button to add attendees manually
- Importing attendee information from a spreadsheet
- Syncing profiles from your registration platform
Give your check-in staff access to the app
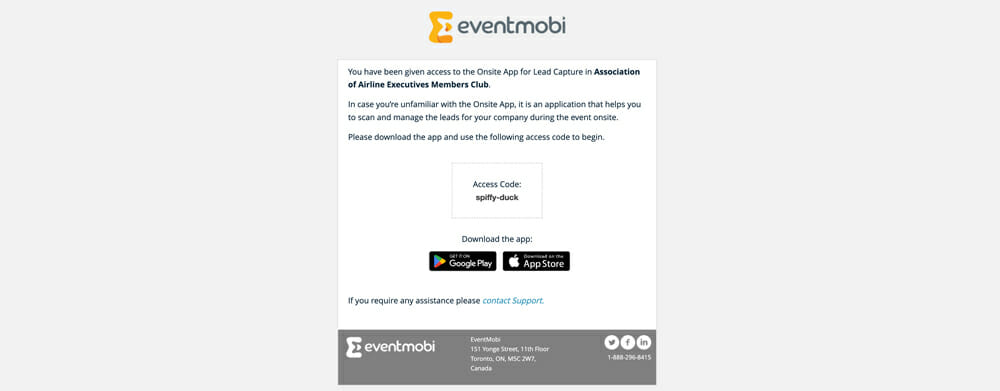
Within the Onsite App section of your Experience Manager, you’ll see an option for Check In where invitations can be sent to anyone who will be managing the check-in process for your event. This allows you to grant event staff access to the Check In feature of the Onsite App–so you can loop various members of your team into the check-in process!
These invitations are sent via email and provide recipients with a unique Access Code that can be used to log into the Check-in App for the event.
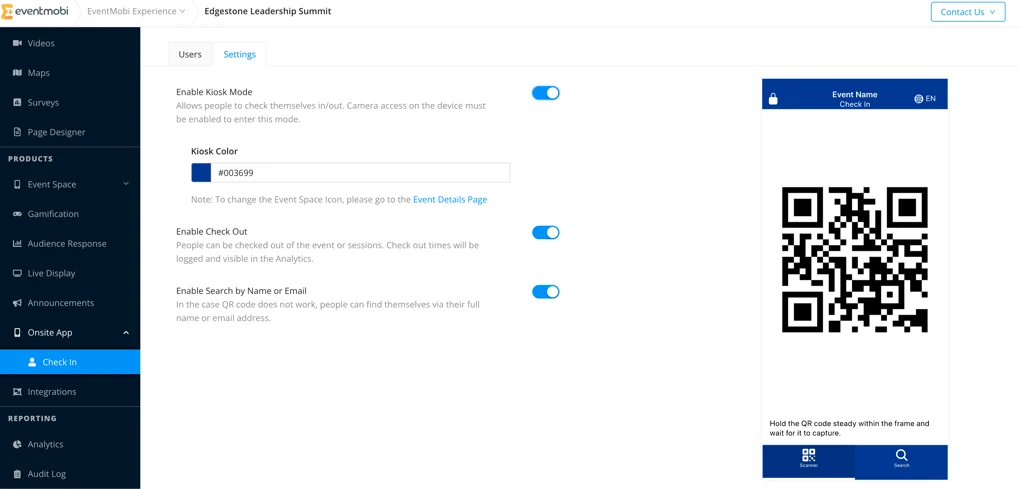
Customize your check-in process
Within the Settings tab of the Check In area of Experience Manager, you will find additional options to help in customizing the Attendee Check In feature that will be used for the event.
The Check In settings options include:
- Enabling Kiosk Mode: Turning on “Kiosk Mode” allows you to offer a self-service option for your attendees to complete the check-in/out process onsite. You can turn any device into a check-in kiosk and attendees will be able to scan their QR code using the front-facing camera.
- Enabling Check Out: This allows you to check attendees out and see how much time each attendee spent at the event and your individual sessions. Checking attendees out of sessions, for example, can help verify attendance for CE credits.
- Enabling Search by Name or Email: To prevent delays if attendees lose their badge or can’t access their phone, you can allow staff to check in attendees by searching for their profile in the Onsite App. Enabling this option provides an alternative to QR scanning for check in, but the QR Code option will still be available when the Search option has been enabled.
Use the Onsite App to manage check-ins
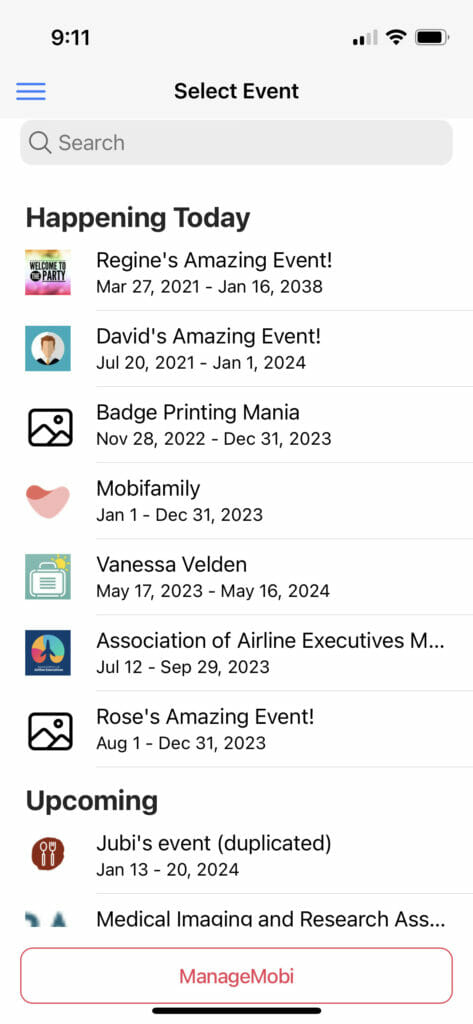
Anyone listed as an event organizer will have access to log into the Onsite App using the same username and password they use to log into the Experience Manager.
Once logged in, the user will find a list of events they have been invited to and/or that they are listed as an organizer for.
After selecting an event, the user will be asked to select between Event or Session Check In. From here, a menu including the following options will be made available: Check In, Check Out, Search, and Kiosk.
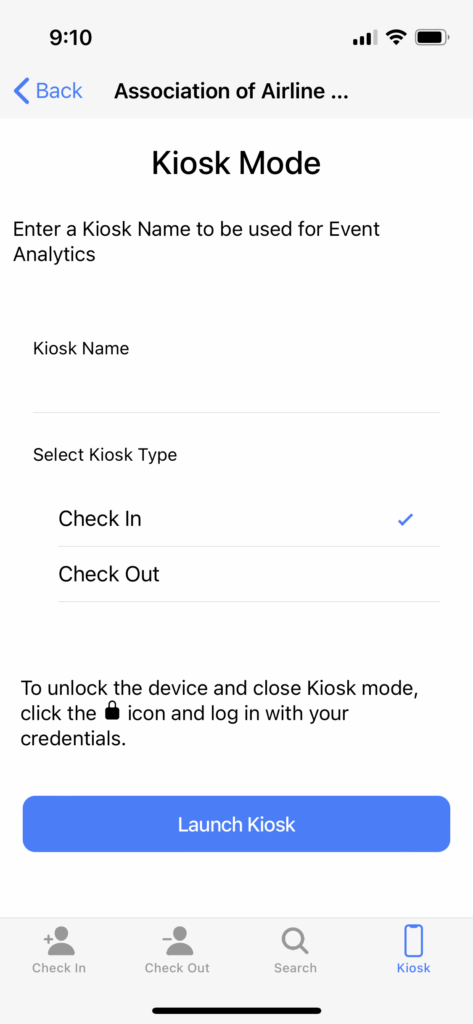
If you want to set up a self-service kiosk at your event, follow these steps:
- Open EventMobi’s Onsite App on the device you’d like to turn into a kiosk and select “Kiosk” from the bottom menu
- Enter a name to represent the particular kiosk you are creating (this will be reflected in your event Analytics)
- Select the type of kiosk that you would like to create: Check In or Check Out (Note: You can change your kiosk type as needed! For example, you could set it up to manage check-ins during the first half of your event and then switch it over to a check-out kiosk once attendees begin to head out)
While in Kiosk mode, attendees can scan their own QR codes to check in or out. If you have enabled the Search option, then this will also be available as an alternative means of checking in or out of the event/sessions.
Tips for Designing Badges for QR Code Check-In
In addition to allowing guests to check in more quickly with an easy-to-scan QR code, a great conference badge design can also:
- Make a great first impression on attendees
- Help attendees identify each other
- Serve as a branding opportunity for your event and organization
To design the best check-in badges for your event, consider these ideas:
Make them visible at a distance
Design your badges to be legible from afar, with large, visible fonts and clear colors. Whether it’s across the buffet table or from the other end of the conference hall, your attendees can easily identify each other.
Include your event logo
Every inch of your event is an opportunity to showcase your brand, and your badges are no exception! Incorporating your event logo into the badge design can elevate its look and feel. Plus, it can give your brand visibility a significant boost.
Include your event title
Having the name of the event printed on a badge creates a sense of belonging among attendees and gives them a memento to remember your event. It can also help reinforce your event branding and create a more cohesive event experience.
Brand your badges
Don’t stop at just adding your logo! Immerse your attendees in your brand by reflecting it in every aspect of your badge design. Use your brand colors, match the font to your brand style, and include your tagline or motto.
Add the schedule
Help attendees stay on track by adding the event schedule to the back of the badges. This provides a handy reference that attendees can check at a glance without having to pull out their phones or event pamphlets.
Add the map
If your event is taking place in a large venue, consider adding a map to the back of your badges. This can help attendees navigate the space more easily and find the sessions or exhibits they’re interested in.
Add networking prompts
Who said event badges have to be all business and no play? Make your badges a conversation starter by adding networking prompts. You can start with something as simple as a “Talk to me about…” section where attendees can jot down their interests.
Keep it simple
While it’s tempting to incorporate all these event badge ideas and pack your badges with bright features and design elements, remember that simplicity is key. An overcrowded badge can be confusing and defeat the purpose of easy identification. So, keep your design clean, your text legible, and your color palette uncluttered. Sometimes, less really is more.

Answers to Common QR Code FAQs
Do QR codes expire?
The short answer? It depends. The long answer? Free QR codes (also called static QR codes) expire once the destination URL no longer works.
Dynamic QR codes (which allow you to change the destination URL as needed), often come with a paid subscription and expire once you stop paying.
How small can a QR code be?
In terms of size, QR codes can be as big or small as you like. Of course, if you’re using QR codes for event check-in, they must be big enough to easily scan. As a general rule, keep QR codes at least 2 cm x 2 cm in size for easy scanning.
Are we running out of QR codes?
In theory, yes, but in practice, no.
The way QR codes are structured allows them to store lots of different information, and they can come in various sizes. Even if we “ran out” of QR code patterns of a certain size, say 2 cm x 2 cm, we could always create new QR codes of other sizes. In other words, don’t worry, we won’t run out of QR codes any time soon!
How long do QR codes last?
QR codes don’t have a maximum duration, and expiration dates depend on the code. Generally, they’ll last as long as their destination links are available!
Can you check QR code history?
Yes, depending on the QR code generation platform you use, you can often track QR code scans. Event management platforms, for example, allow you to track event or session attendance data based on QR code check-ins.
How to check attendance using a QR code
To check attendance for an event, organizers or volunteers can send a unique QR code to each attendee, and then scan attendees’ QR codes as they enter the event or specific sessions.
How to check if a QR code works
You can test a QR code by scanning it with a QR code reader app (or just with your smartphone’s camera!) and seeing if it redirects to the expected destination.
How to check in a QR code for people with badges
You can check in attendees by scanning the QR code on their badges using the check-in app on your phone. Depending on the event platform you use, a self-service mode may be available that lets attendees scan the QR code and check in on their own!
Interested in setting up a QR code check-in system for your event? 🪪 EventMobi can help! Contact us to learn more.